
There's just something truly magical about a piece of Sees Candy fudge, isn't there? That rich, smooth chocolate melting in your mouth, a little bit of sweetness that makes your day brighter. You know, sometimes my writing talks about really different things, like how to set up a panel control in ASP.NET or the finer points of payment methods. But today, we're shifting gears completely to something much, much sweeter. This article, you see, is all about bringing that famous candy shop experience right into your kitchen.
Making fudge at home might seem a little bit tricky, almost like trying to organize a whole group of controls on a web page. People often worry about it turning out too grainy or not setting up properly. But honestly, with the right steps and a little patience, you can create something incredibly delicious. It's a very rewarding process, giving you a chance to make a treat that tastes like it came from a professional candy maker.
So, we're going to walk through everything you need to know to whip up your very own batch of creamy, dreamy fudge. We'll cover the ingredients, the steps, and even some clever tips to make sure your fudge turns out perfectly every single time. By the way, get ready for some serious chocolate satisfaction!
Table of Contents
- What Makes Sees Candy Fudge So Special?
- Gathering Your Sweet Supplies: Ingredients for Sees Candy Fudge
- Step-by-Step: Crafting Your Own Sees Candy Fudge
- Tips for Fudge Perfection
- Storing Your Homemade Delight
- Frequently Asked Questions About Homemade Fudge
- Your Sweet Success Story
What Makes Sees Candy Fudge So Special?
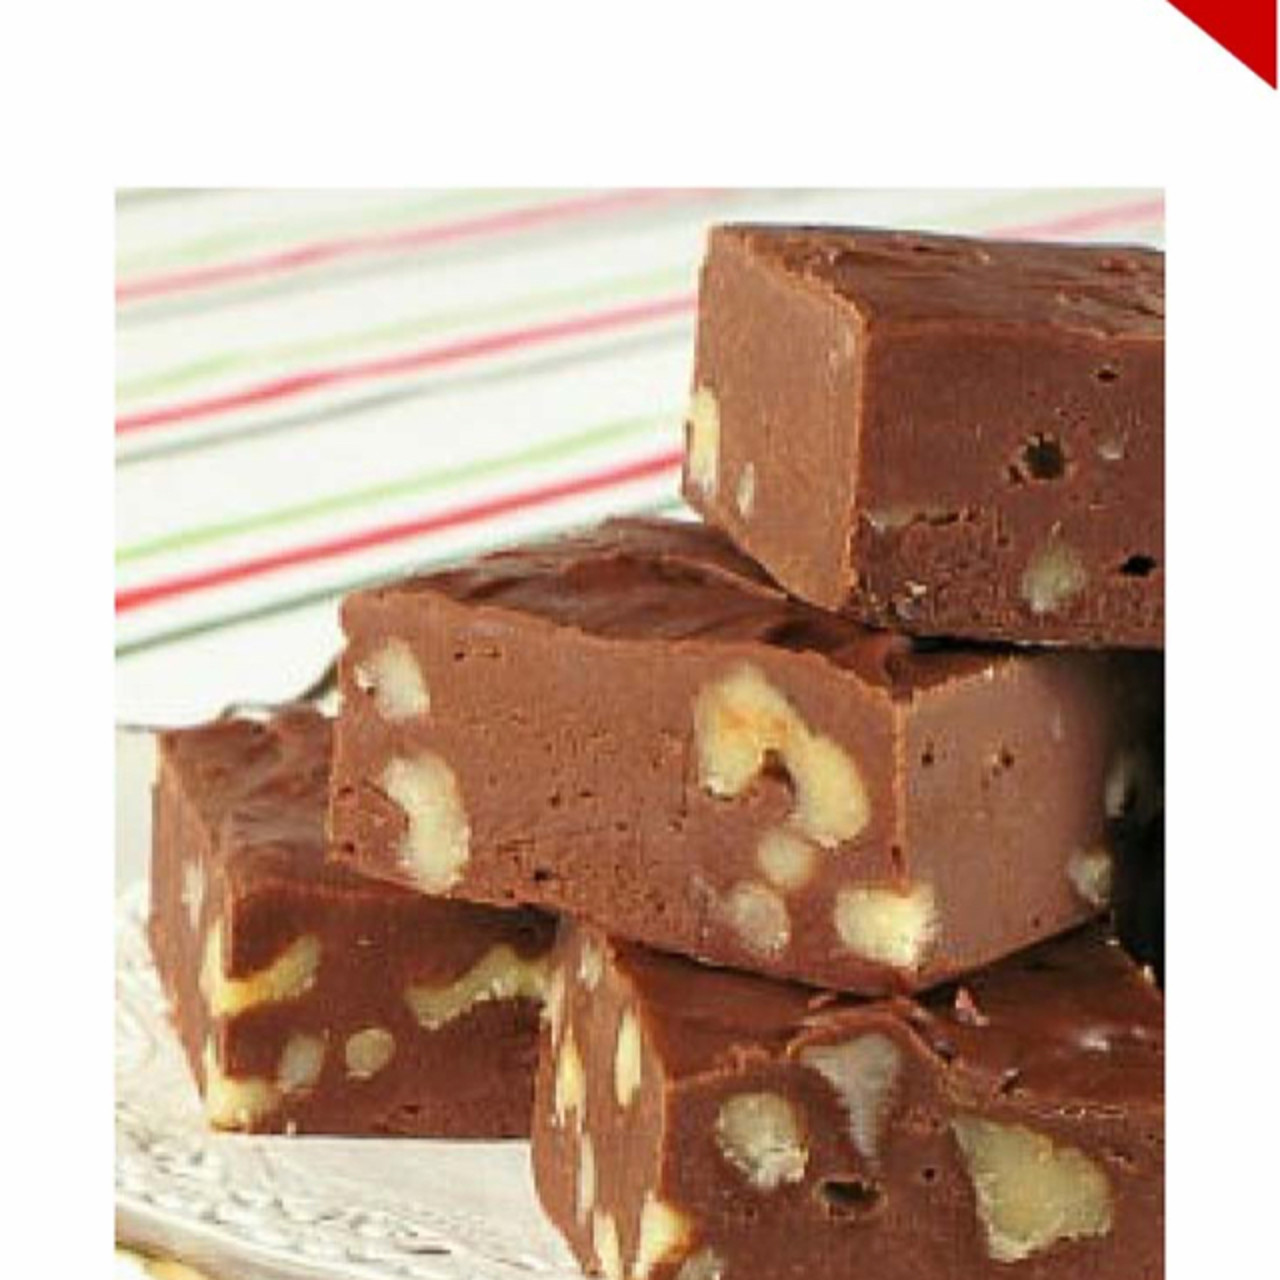
When you think about Sees Candy fudge, a few things probably come to mind. It's that incredibly smooth texture, for one. It's never grainy or sugary in a bad way. It just melts beautifully in your mouth, which is really what you want in a good piece of fudge. That smooth quality is a hallmark of their product, and it's something we aim for in our homemade version, too.
Then there's the deep, rich chocolate flavor. It's not overly sweet, but it has that classic, comforting taste that takes you back to childhood. It's a very specific kind of chocolate experience, quite distinct from other candies. This unique flavor profile, you know, makes it a favorite for so many people around the world. It’s a classic for a good reason.
And, of course, there's the nostalgia. For many, Sees Candy represents special occasions or gifts from loved ones. Making this fudge at home isn't just about the taste; it's about recreating a bit of that warm, happy feeling. It's almost like a little piece of edible history, isn't it?
Gathering Your Sweet Supplies: Ingredients for Sees Candy Fudge
Before we get started, it's pretty important to have all your ingredients measured out and ready. This helps things move along smoothly, preventing any last-minute scrambling. It's a bit like preparing your workspace before you start coding, ensuring all your variables are declared, you know? This way, you can focus on the process itself.
Here's what you'll need for this delightful **sees candy fudge recipe**:
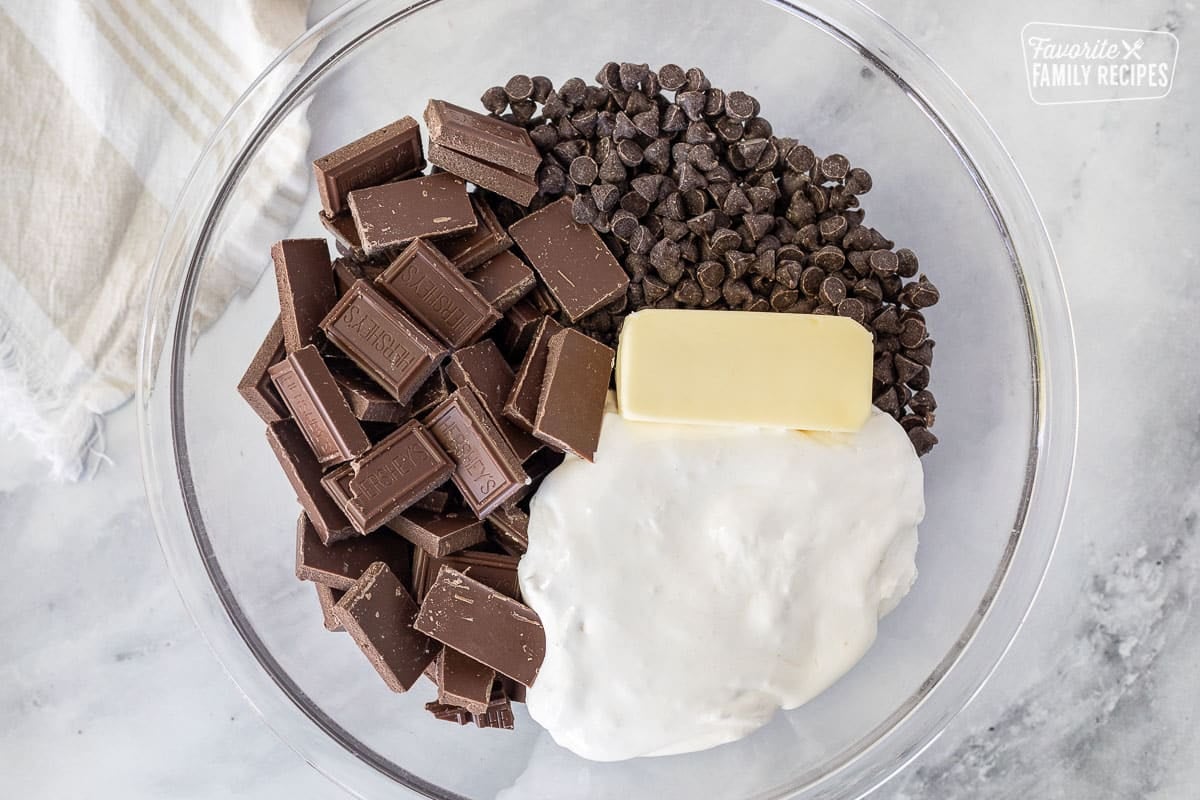
- Granulated Sugar: About 3 cups. This provides the main sweetness and helps with the fudge's structure.
- Unsalted Butter: Around 1 cup (two sticks). This adds richness and a wonderful creamy texture. It's really important for that melt-in-your-mouth feel.
- Evaporated Milk: One 12-ounce can. This is a key ingredient for creaminess and helps prevent crystallization. It's different from regular milk, so don't swap it out.
- Semi-Sweet Chocolate Chips: About 2 cups (12 ounces). High-quality chocolate makes a big difference in flavor, so choose something you really like. This is basically the heart of your fudge.
- Milk Chocolate Chips: Around 1 cup (6 ounces). Combining semi-sweet and milk chocolate gives a lovely balanced flavor, not too bitter, not too sweet. It adds a nice complexity.
- Marshmallow Cream (or Fluff): One 7-ounce jar. This is a secret weapon for achieving that incredibly smooth, soft texture. It helps prevent the fudge from getting too hard.
- Vanilla Extract: About 1 teaspoon. Pure vanilla extract adds a lovely depth of flavor that complements the chocolate beautifully. It's a small touch that makes a big impact, honestly.
- A Pinch of Salt: Just a tiny bit, maybe 1/4 teaspoon. This really helps to bring out the chocolate flavor and balance the sweetness. It’s kind of like a flavor enhancer.
Having everything measured and at room temperature, where applicable, can make a real difference in your final product. It ensures everything combines correctly and cooks evenly. You know, it's just good practice for any kind of cooking or baking.
Step-by-Step: Crafting Your Own Sees Candy Fudge
Now, let's get to the fun part: making the fudge! This process is pretty straightforward, but it does require attention to detail at certain points. Think of it like following a clear set of instructions for installing a panel, where each step builds on the last. You want to make sure each part is done correctly for the best outcome.
Preparing Your Space
First things first, you'll want to get your pan ready. Take a 9x13 inch baking pan and line it with parchment paper or aluminum foil, letting the edges hang over a bit. This creates a kind of sling, which makes it super easy to lift the cooled fudge out later. You can lightly grease the paper or foil, too, just for extra insurance. It's a small step, but it really helps later on, you know?
Also, have all your chocolate chips, marshmallow cream, vanilla, and salt measured out and sitting near your stovetop. This way, when the time comes to add them, you won't be scrambling. It's all about smooth transitions, which makes the whole process less stressful, basically.
The Melting Pot Magic
In a large, heavy-bottomed saucepan or Dutch oven, combine your granulated sugar, butter, and evaporated milk. Place this over medium heat. You'll want to stir it constantly as it heats up, just until the butter melts and the sugar dissolves. This early stirring is pretty important, preventing anything from sticking to the bottom. It's a bit like making sure all your components are initialized correctly, you know?
Keep stirring until the mixture comes to a gentle boil. This initial phase is all about getting everything nicely incorporated and warm. Don't rush it; let the ingredients melt together slowly and evenly. You want a smooth, unified base before moving on to the next critical step.
The Critical Boil
Once your mixture reaches a rolling boil, stop stirring. This is a really important part. Let it boil undisturbed for exactly 5 minutes. You can set a timer for this, and it's something you definitely want to pay attention to. The boiling without stirring helps prevent sugar crystals from forming, which can make your fudge grainy. It's a bit of a precise science, you know?
During these 5 minutes, the mixture will thicken slightly and get darker in color. Some people like to use a candy thermometer here, and if you have one, aim for about 234-238°F (112-114°C), which is the soft-ball stage. However, for this recipe, a strict 5-minute boil after reaching a rolling boil usually works perfectly. Just make sure it's a *rolling* boil, not just a simmer, that's really key.
Cooling and Beating to Perfection
After the 5 minutes are up, immediately remove the saucepan from the heat. Now, quickly add both types of chocolate chips, the marshmallow cream, vanilla extract, and the pinch of salt to the hot mixture. Do not stir yet! Just let all those wonderful ingredients sit on top of the hot fudge mixture for about 2-3 minutes. This allows the residual heat to start melting the chocolate and softening the marshmallow cream. It's a crucial little resting period, you know, before the big mix.
After that brief resting time, it's time to beat! Grab a sturdy spoon or a wooden spatula and start stirring vigorously. You'll want to stir continuously until all the chocolate is completely melted and the mixture is smooth, thick, and has lost some of its glossy shine. This beating process can take a few minutes, maybe 3 to 5 minutes, and it's what gives the fudge its signature creamy texture. It's almost like aerating it, basically.
Keep beating until you feel the mixture start to thicken and become a bit more resistant to your stirring. You'll notice it changing from a shiny liquid to a more matte, thick consistency. This is the point where it's ready to be poured. Don't overbeat, but make sure it's well combined and thick. You'll definitely feel the change in texture as you stir, that's for sure.
Setting the Stage
Once your fudge is perfectly beaten and thick, pour it quickly into your prepared 9x13 inch pan. Use your spatula to spread it evenly into all the corners. You can gently tap the pan on the counter a few times to help settle it and remove any air bubbles. It's a pretty satisfying moment, seeing that smooth surface.
Now comes the hardest part: waiting. Let the fudge cool completely at room temperature for at least 2-4 hours, or even longer, until it's firm. Some people like to pop it in the refrigerator to speed things up, but letting it set at room temperature often results in a creamier texture. Once it's firm, use the parchment paper or foil overhang to lift the entire block of fudge out of the pan. Then, place it on a cutting board and cut it into small, bite-sized squares. You know, patience really pays off here.
Tips for Fudge Perfection
Making fudge is pretty straightforward, but a few little tricks can make all the difference. These tips can help you avoid common pitfalls and get that perfect, creamy texture every time. It’s like having a few extra lines of code to handle edge cases, basically.
- Temperature Matters: If you're feeling a bit unsure about the boiling time, using a candy thermometer is a great idea. Aim for the soft-ball stage, which is usually between 234°F and 238°F (112°C and 114°C). This ensures your sugar syrup is cooked to the right consistency, which is really important for the final texture.
- Don't Stir During the Boil: This is a big one. Once the mixture starts to boil, resist the urge to stir it until you add the chocolate and marshmallow cream. Stirring during the boil can encourage sugar crystals to form, leading to grainy fudge. You want a smooth result, so just let it do its thing for those 5 minutes, you know?
- Beat It Right: The beating stage after adding the chocolate is crucial. You need to stir vigorously until the fudge thickens and loses its glossy sheen. If you don't beat it enough, it might not set properly. If you beat it too much, it can become crumbly. It's a bit of a feel thing, but you'll notice the change in consistency.
- High-Quality Ingredients: Using good quality chocolate chips really makes a difference in the flavor of your fudge. You know, if you start with good ingredients, your final product will taste so much better. It's worth spending a little extra for better chocolate, honestly.
- Clean Sides of the Pan: As the mixture boils, sometimes sugar crystals can form on the sides of the pan. You can use a pastry brush dipped in water to gently brush down these crystals into the boiling mixture. This helps prevent graininess. It's a small detail, but it can be quite helpful.
- Get Creative with Add-ins: Once your fudge is poured into the pan, but before it sets, you can sprinkle on some fun toppings. Think chopped nuts like walnuts or pecans, mini marshmallows, or even a swirl of peanut butter. This is where you can really make it your own, basically.
- Altitude Adjustments: If you live at a high altitude, you might need to adjust the cooking temperature or time slightly. Water boils at a lower temperature at higher altitudes, so your fudge might need to cook to a slightly lower temperature on a candy thermometer. It's something to keep in mind, you know, if your fudge isn't setting quite right.
Storing Your Homemade Delight
Once your beautiful **sees candy fudge recipe** creation is cut into squares, you'll want to store it properly to keep it fresh and delicious. Proper storage helps maintain that wonderful texture and flavor for as long as possible. It’s like saving your work in a secure location, you know?
Store the fudge in an airtight container at room temperature. It will stay fresh and tasty for about 1 to 2 weeks this way. If your kitchen is particularly warm, you might want to store it in the refrigerator. Just be aware that refrigeration can sometimes make fudge a little bit firmer, so let it come to room temperature before serving for the best texture. It’s a pretty simple way to keep it good.
For longer storage, you can freeze fudge! Wrap individual pieces tightly in plastic wrap, then place them in an airtight freezer-safe container or bag. Frozen fudge can last for up to 3 months. When you're ready to enjoy it, simply thaw it at room temperature. It’s a really convenient option for making ahead, that's for sure.
Frequently Asked Questions About Homemade Fudge
Why is my fudge crumbly?
If your fudge turns out crumbly, it's usually because it was cooked to too high a temperature or beaten for too long. Overcooking causes too much moisture to evaporate, making the sugar crystals too large and hard. Beating it for too long after adding the chocolate can also cause it to seize up and become dry. Next time, try cooking it for a slightly shorter time or removing it from the heat a little sooner. You know, it's a common issue, but fixable.
Can I use different chocolate in this recipe?
Absolutely! While this **sees candy fudge recipe** uses a mix of semi-sweet and milk chocolate for that classic flavor, you can certainly experiment. You could use all semi-sweet for a darker fudge, or even try adding some white chocolate chips for a different flavor profile. Just keep in mind that different types of chocolate melt at slightly different rates, so you might need to adjust your stirring time a little bit. It's kind of fun to play around with it, honestly.
How long does homemade fudge last?
When stored properly in an airtight container at room temperature, your homemade fudge will typically stay fresh for about 1 to 2 weeks. If you keep it in the refrigerator, it can last a bit longer, maybe up to 3-4 weeks, though the texture might become a little firmer. For really long-term storage, freezing it is your best bet; it can last for up to 3 months in the freezer. So, you know, you've got options.
Your Sweet Success Story
Making your own **sees candy fudge recipe** at home is a really rewarding experience. You get to enjoy that incredible, creamy taste, and you also get the satisfaction of creating something truly special with your own hands. It's a wonderful treat to share with family and friends, or just to keep all to yourself, basically. The aroma alone is pretty inviting.
So go ahead, gather your ingredients, follow these steps, and prepare to impress everyone with your candy-making skills. You'll be amazed at how simple it is to achieve such a luxurious result. For more sweet ideas and helpful kitchen tips, you can always learn more about delicious treats on our site, and we have even more baking tips available to help you out. Happy fudge making!

Detail Author:
- Name : Laura Grant
- Username : wleannon
- Email : ralph03@yahoo.com
- Birthdate : 1978-05-23
- Address : 66457 Parker Corner North Ava, OK 27909-7894
- Phone : +1 (954) 376-5069
- Company : Marks, Kuhic and Towne
- Job : Reporters OR Correspondent
- Bio : Aut adipisci inventore autem et aut. Et quia voluptatibus asperiores dicta illo aspernatur. Blanditiis dicta in neque omnis sed eum veritatis iste.
Socials
facebook:
- url : https://facebook.com/kennedi_real
- username : kennedi_real
- bio : Ipsa et iure distinctio aliquid iure tenetur quasi.
- followers : 4404
- following : 2814
linkedin:
- url : https://linkedin.com/in/kennedi.dicki
- username : kennedi.dicki
- bio : Qui modi laudantium quia possimus quisquam.
- followers : 4341
- following : 781
instagram:
- url : https://instagram.com/kennedi_real
- username : kennedi_real
- bio : Rerum cum eum et blanditiis ut. Ea culpa accusantium autem ut voluptates non et.
- followers : 638
- following : 2718
