
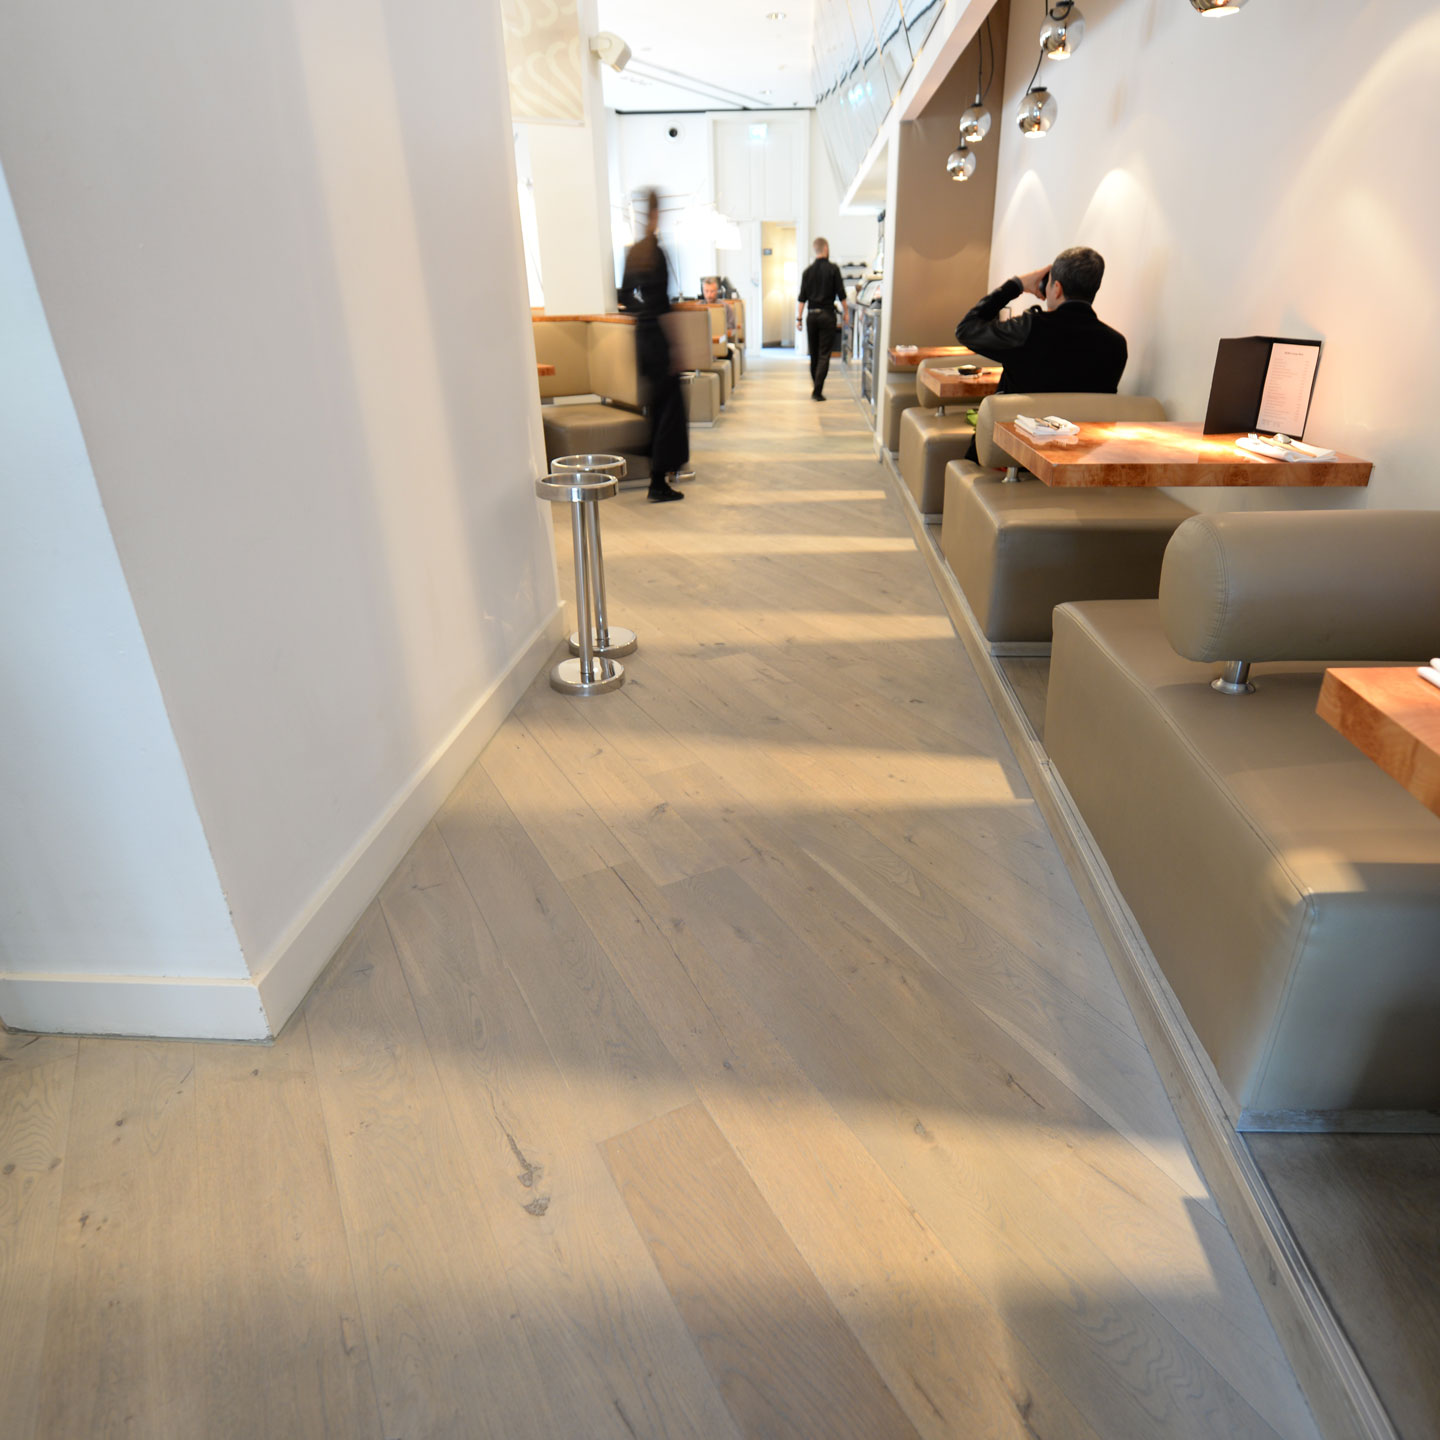
Are you looking to give your living space a fresh, airy feel without a complete overhaul? Whitewash wood floors might just be the perfect answer for you, you know. It’s a wonderful way to transform a room, making it feel bigger and brighter, and it brings a lovely, relaxed vibe that so many people are really drawn to these days. Just think about how a lighter floor can really open up a place.
This approach to floor finishing offers a charming, somewhat rustic look that lets the natural beauty of your wood still peek through, which is pretty neat. Unlike a solid paint job that completely covers everything, whitewash allows the grain of your floorboards to remain visible, giving them a kind of weathered, antique appearance. It’s a bit like giving your floors a soft, translucent veil.
If you're considering this project, whether you’re aiming for a farmhouse style or just want to lighten things up, you’re in the right spot. We'll walk through what whitewash is all about, why it's a popular choice, and how you can achieve this beautiful finish in your own home, so you can see if it's for you.
Table of Contents
- What Exactly is Whitewash?
- Why Pick Whitewash for Your Floors?
- Is Whitewashing the Right Fit for Your Floor?
- Gathering Your Tools and Materials
- Getting Your Floor Ready
- The Whitewashing Process: Step-by-Step
- Finishing and Keeping Your Whitewashed Floor Safe
- Helpful Hints for a Great Outcome
- Common Questions About Whitewashing Floors
- A Final Thought
What Exactly is Whitewash?
Whitewash, sometimes called calcimine or lime paint, is a special kind of coating that’s been around for a very long time, actually. It's made from really simple stuff, typically slaked lime, which is calcium hydroxide, or sometimes chalk, which is calcium carbonate. You might have heard of it being used on farms, like inside barns or chicken coops, where it acts as a kind of protective layer or sealant, you know.
The traditional way to make it involves mixing powdered lime with water, and that's pretty much it. What makes whitewash different from regular paint is how it sits on the surface. Paint usually forms a solid, opaque layer that completely hides what’s underneath. But whitewash? It's much more translucent. It allows the natural texture and grain of the wood to show through, which is a key part of its appeal, so it's a bit different.
This unique quality gives floors a soft, muted look, almost like they've been gently bleached by the sun and time. It contributes to a weathered, antique feel that’s very charming and, in a way, feels quite authentic. It's a method that brightens without completely erasing the character of the wood, which is rather nice.
Why Pick Whitewash for Your Floors?
There are quite a few good reasons why someone might choose to whitewash their wood floors, really. For one, it’s a fantastic way to brighten up a room that feels a bit dark or cramped. Lighter floors tend to reflect more light, making the entire space appear more open and airy, which is pretty much what most people want.
Another big draw is the specific style it creates. If you’re a fan of farmhouse aesthetics, coastal vibes, or even a Scandinavian minimalist look, whitewash fits right in. It gives floors a soft, somewhat rustic charm that’s hard to get with other finishes. Plus, it can help disguise minor imperfections or variations in the wood, blending them into a more cohesive, light surface, so that's a bonus.
Compared to completely replacing or refinishing floors with a darker stain, whitewashing can be a more budget-friendly option. It’s a DIY-friendly project that can dramatically change the feel of a room without breaking the bank. And, you know, it lets the natural wood grain show through, adding to that weathered, antique look that many people find very appealing right now.
Is Whitewashing the Right Fit for Your Floor?
Before you jump in, it's a good idea to think about your existing floors and if whitewashing is the best choice for them, you know. Most wood types can be whitewashed, but the final appearance can vary quite a bit depending on the wood’s original color and grain. Lighter woods, like pine or oak, tend to take whitewash beautifully, allowing that subtle grain to shine through. Darker woods might require more coats to achieve the desired lightness, or they might end up with a slightly different undertone, so it's something to consider.
The condition of your floors matters, too. While whitewash can help hide minor flaws, deeply damaged or uneven boards will still show through. You'll want to address any major repairs before starting. Also, think about the traffic your floor sees. High-traffic areas might need a more durable topcoat to protect the whitewash from wear and tear, which is pretty important for longevity.
Ultimately, if you’re looking for a finish that brightens, adds character, and embraces a slightly imperfect, lived-in feel, then whitewashing could be absolutely perfect for your home. It's about enhancing, not hiding, the wood's natural story, in a way.
Gathering Your Tools and Materials
Getting everything ready before you start will make the whole process much smoother, really. Here’s a basic list of what you’ll probably need to get your whitewash wood floor project going:
- Sandpaper: Various grits, from coarser (like 60-80) for initial sanding to finer (120-150) for smoothing.
- Orbital Sander: Or a drum sander for larger areas.
- Vacuum and Microfiber Cloths: For dust removal.
- Painter's Tape: To protect baseboards and walls.
- Drop Cloths: To cover anything you don't want to get whitewash on.
- Whitewash Mixture: You can buy ready-made whitewash or make your own using slaked lime or thinned white paint.
- Paint Brushes or Rollers: For applying the whitewash. A wide brush or a roller with a short nap works well.
- Clean Rags or Sponges: For wiping away excess whitewash.
- Stirring Stick: To mix your whitewash thoroughly.
- Protective Topcoat/Sealant: A water-based polyurethane is a common choice for durability.
- Personal Protective Gear: Gloves, safety glasses, and a mask are pretty important.
Having these items on hand means you won't have to stop midway through, which is always a good thing, you know.
Getting Your Floor Ready
Proper preparation is, honestly, the most crucial part of achieving a beautiful and lasting whitewashed floor. Skipping steps here can lead to disappointing results, so take your time with this bit. First off, you need to clear the room completely. Move out all furniture, rugs, and anything else that might be in the way. This gives you a clear workspace, which is pretty essential.
Next, you'll need to clean the floors thoroughly. Vacuum up any loose dirt or debris. Then, give the floor a good scrub with a wood-safe cleaner to remove any grime, wax, or old finishes. Make sure the floor is completely dry before moving on, which is quite important.
Sanding is the next big step. This helps open up the wood grain so it can properly absorb the whitewash. Start with a coarser grit sandpaper (like 60 or 80) to remove any old finish and smooth out imperfections. Then, move to a finer grit (120 or 150) to create a smooth surface that’s ready for the whitewash. Sand with the grain of the wood for the best results, always. After sanding, vacuum the entire floor meticulously to pick up all the dust. Then, wipe it down with a slightly damp microfiber cloth to catch any lingering dust particles. This dust can really mess with your finish, so be thorough, you know.
Finally, use painter's tape to protect your baseboards and any other areas you don't want to get whitewash on. Lay down drop cloths if needed. A clean, smooth, dust-free surface is your canvas, basically, for a really good whitewash finish.
The Whitewashing Process: Step-by-Step
Now for the fun part: applying the whitewash! This is where your floors really start to transform. First, if you're mixing your own whitewash, remember that traditional whitewash is made by mixing powdered lime with water. You can also use thinned white paint for a similar effect. A good starting ratio for thinned paint is about one part paint to one part water, but you might adjust this depending on how opaque or translucent you want the finish to be. Stir it very, very well to make sure there are no clumps, you know.
Before you tackle the whole floor, it’s a smart idea to test your whitewash mixture on a small, out-of-the-way spot, maybe in a closet or under where furniture will sit. This lets you see how the color will look and if the consistency is right for your wood. It's a bit like a dress rehearsal, in a way.
When you’re ready, apply the whitewash in small sections, working with the grain of the wood. You can use a wide brush or a roller. If you're using a brush, apply it evenly, making sure not to put too much on at once. If you’re using a roller, choose one with a short nap for a smoother application. The goal is to get a thin, even coat, basically.
After applying a section, use a clean rag or sponge to wipe away any excess whitewash. This is where you control how much of the wood grain shows through. For a more transparent look, wipe more aggressively. For a slightly more opaque finish, wipe less. This step is pretty important for getting that signature translucent effect, so take your time with it.
Let the first coat dry completely. This could take a few hours, depending on humidity and how thick you applied it. Once dry, assess the look. If you want a lighter, more solid appearance, you can apply a second coat, repeating the same process of applying and wiping. Most people find one or two coats are usually enough to get the look they want, but it's really up to your preference. It’s a process that allows for a lot of personal touch, actually.
Remember, whitewash, unlike regular paint, is designed to let the base coat or wood grain show through, adding to that weathered, antique feel. So, don't expect a completely solid, uniform color. The beauty is in the subtle variations and the visible wood texture. This approach truly highlights the unique character of your floors, which is pretty cool, when you think about it.
Finishing and Keeping Your Whitewashed Floor Safe
Once your whitewash is completely dry and you're happy with the look, the next step is to protect it. Whitewash itself isn't incredibly durable on its own, especially on a floor that sees a lot of foot traffic. So, applying a protective topcoat is pretty essential for keeping your beautiful new finish looking good for a long time, you know.
A water-based polyurethane is a popular choice for this. It's clear, durable, and won't yellow over time like some oil-based finishes can. Apply the topcoat in thin, even layers, following the manufacturer's instructions. Usually, two or three coats are recommended for floors, with light sanding between coats if the instructions suggest it. Make sure each coat dries completely before applying the next one, which is rather important.
Allow the final topcoat to cure fully before putting furniture back or walking on the floor regularly. Curing time can vary, but it's often several days to a week. This allows the finish to harden properly and achieve its maximum durability. Taking this extra time will really pay off in the long run, actually, by protecting your hard work.
Helpful Hints for a Great Outcome
Getting a fantastic whitewashed floor is all about the details, in a way. Here are a few extra pointers to help you along. Always work in a well-ventilated area, for starters. Open windows and use fans to keep the air moving, which is pretty important for your health and for drying times.
When you're wiping, use a light touch for a more transparent effect, and apply a bit more pressure if you want less of the wood grain to show through. This lets you really customize the look, you know. Also, if you’re using thinned paint, keep stirring your mixture often. The pigments can settle at the bottom, leading to inconsistent color, so that's something to watch out for.
Don't rush the drying times between coats, either for the whitewash or the topcoat. Patience here prevents stickiness and ensures a smooth, even finish. And remember, a little goes a long way with whitewash. It's easier to add more coats for a brighter look than to try and remove too much. So, start light and build up the coverage if you need to, which is typically a good approach.
Common Questions About Whitewashing Floors
People often have a few questions when they’re thinking about whitewashing their floors. Here are some of the most common ones, and their answers, basically.
Can you whitewash any wood floor?
Pretty much any wood floor can be whitewashed, but the results will vary depending on the type of wood. Lighter woods like pine, oak, or maple tend to show the whitewash effect most clearly, allowing the grain to stand out beautifully. Darker woods can be whitewashed too, but they might need more coats to achieve a noticeable lightening effect, and the undertones of the wood might influence the final color, you know.
Is whitewashing floors durable?
The durability of a whitewashed floor really comes down to the protective topcoat you apply over it. The whitewash itself is more decorative than protective. When you seal it with a high-quality, durable topcoat, like a water-based polyurethane, it can be quite hard-wearing. For areas with heavy foot traffic, choosing a very tough topcoat and applying enough layers is pretty important for long-term wear.
How do you prepare a floor for whitewashing?
Preparing the floor is a super important step for a good whitewash finish. You need to start by thoroughly cleaning the floor to remove any dirt, grease, or old finishes. Then, sanding is essential to open up the wood grain so it can absorb the whitewash properly. Start with a coarser grit and finish with a finer one. After sanding, vacuum and wipe down the floor completely to remove all dust, which is crucial for an even application, actually. You can learn more about wood floor care on our site, and also check out this page for more home renovation ideas.
A Final Thought
Whitewashing your wood floors is a truly rewarding project that can completely change the feel of your home. It’s a way to bring in light, add character, and create a fresh, inviting atmosphere. By understanding what whitewash is, preparing your floors well, and following the steps carefully, you can achieve a stunning, custom look that you'll love for years to come. It's a bit of work, sure, but the outcome is really quite special. So, why not give your floors that beautiful, bright update they might be wanting this season? For more ideas on how to update your home, you might want to check out some of the current trends in interior design, as of October 2023, for example, many people are looking for ways to bring more natural light into their spaces, and whitewash floors fit that perfectly. You can find more inspiration on home improvement projects at a reputable source like Hunker, which offers great advice on DIY home updates.

Detail Author:
- Name : Domenick Pollich I
- Username : cboehm
- Email : jeremie.herzog@hotmail.com
- Birthdate : 1970-02-23
- Address : 2757 Zieme Inlet Apt. 024 Harbermouth, NM 66832-4672
- Phone : +1.302.883.3380
- Company : O'Hara, Ebert and Wolff
- Job : Chemical Engineer
- Bio : At corrupti voluptatem perspiciatis esse voluptates pariatur. Aut inventore adipisci modi ipsum. Sapiente eum voluptas sint nihil saepe. Officia magnam illum quos voluptates et.
Socials
twitter:
- url : https://twitter.com/camren.boehm
- username : camren.boehm
- bio : Et est magni aut nihil qui voluptas. Qui quidem reprehenderit impedit qui. Non pariatur consequuntur fugit iure eaque. Molestias hic perspiciatis facilis quod.
- followers : 790
- following : 1563
linkedin:
- url : https://linkedin.com/in/boehm1971
- username : boehm1971
- bio : Illum expedita accusantium nemo consequatur.
- followers : 989
- following : 1462
instagram:
- url : https://instagram.com/camren.boehm
- username : camren.boehm
- bio : Delectus aut eum cumque dolorem nesciunt. Est nulla numquam non sit est tempore harum debitis.
- followers : 4785
- following : 96
tiktok:
- url : https://tiktok.com/@boehmc
- username : boehmc
- bio : Debitis vitae distinctio ullam aperiam consectetur.
- followers : 4884
- following : 853
facebook:
- url : https://facebook.com/camren_real
- username : camren_real
- bio : Velit iste pariatur inventore sed ad a.
- followers : 5773
- following : 1715
