
Do you ever look at your favorite deck of playing cards and wish it had a home that was just as special? Maybe the original box is worn out, or perhaps you bought a deck without one. So, a custom playing card box template could be just what you need, honestly. It's a wonderful way to keep your cards safe and add a personal touch to your game setup. People often see a well-kept deck and know someone cares about their cards, you know?
Think about it, when you have a nice box for your cards, it's like setting the stage for a good time. Whether you're getting ready for a friendly game of poker, a quick round of solitaire, or even something more involved like bridge, having your cards neatly put away makes all the difference. It shows you're ready to play, and that's a good feeling, right?
Making your own box is also a creative project, kind of like when someone is playing the piano and making music. The piano is just a tool, but the music is the creation. Here, the template is your tool, and your finished box is your own unique creation, very much your own. It's a fun activity for a quiet afternoon, and you end up with something really useful, too.
Table of Contents
- Why Make Your Own Card Box?
- What You Need to Get Started
- Finding and Using a Playing Card Box Template
- Personalizing Your Card Box
- Keeping Your Cards Safe and Ready
- Frequently Asked Questions About Card Box Templates
Why Make Your Own Card Box?
There are lots of good reasons to make a box for your playing cards, you know? For one, those paper boxes that cards often come in just don't last very long. They get bent, torn, or just plain worn out from being opened and closed so much. A sturdy, homemade box means your cards stay in better shape for longer, which is pretty important if you like playing games often.
Another big reason is personalization. When you make something yourself, it gets your own touch, so it's unique. You can pick the colors, the patterns, and even add little drawings or messages. This makes your card box special, unlike anything you could buy in a store, which is pretty neat. It's a chance to show off your style, basically.
Also, think about gifts. A custom playing card box, filled with a new deck, makes a really thoughtful present for someone who enjoys card games. It shows you put effort into it, and that's always appreciated. It's a way to give something useful that also has a bit of your personality in it, and that's quite nice, honestly.
What You Need to Get Started
Before you begin cutting and gluing, it's good to gather everything you'll need. Having all your materials and tools ready makes the whole process smoother and more enjoyable, you know? It's like getting ready for a big game; you want all your pieces in place.
Materials for Your Box
The kind of material you pick will change how your box feels and how long it lasts, so choose wisely.
Cardstock or Craft Board: This is a really good choice for making a sturdy box. It's thicker than regular paper, so it holds its shape well. You can find it in many colors and even some with textures, which is pretty cool. You want something that can handle a bit of folding and still look good, you know?
Decorative Paper: If you want to make your box look extra special, you can use decorative paper to cover the cardstock. This could be scrapbook paper, patterned paper, or even just some nice colored paper. It adds a lot of visual appeal, so it's a great option.
Glue: A good strong craft glue or a glue stick will work well. You want something that dries clear and holds firmly, so your box doesn't fall apart. Some people prefer a liquid glue for stronger bonds, especially on thicker materials, which is fair enough.
Optional Embellishments: Think about ribbons, stickers, glitter, or anything else that can make your box stand out. This is where you can really get creative and make it truly yours, almost like adding the finishing touches to a piece of music.
Tools to Help You
Having the right tools makes the job easier and helps you get cleaner results, you know?
Printer: You'll need this to print out your playing card box template. Make sure your printer has enough ink and paper, so you don't stop halfway through, which happens sometimes.
Scissors or Craft Knife: For cutting out the template. A craft knife with a cutting mat gives you really clean, straight lines, which is pretty useful for a box. If you use scissors, try to use sharp ones.
Ruler: This is super helpful for getting straight cuts and for scoring your folds. A metal ruler is often best because your knife won't cut into it, so that's a good idea.
Scoring Tool (or a blunt knife/empty pen): This helps you make crisp, clean folds. You just press along the fold lines with a blunt object, and it makes the paper bend neatly. It's a small thing, but it makes a big difference, honestly.
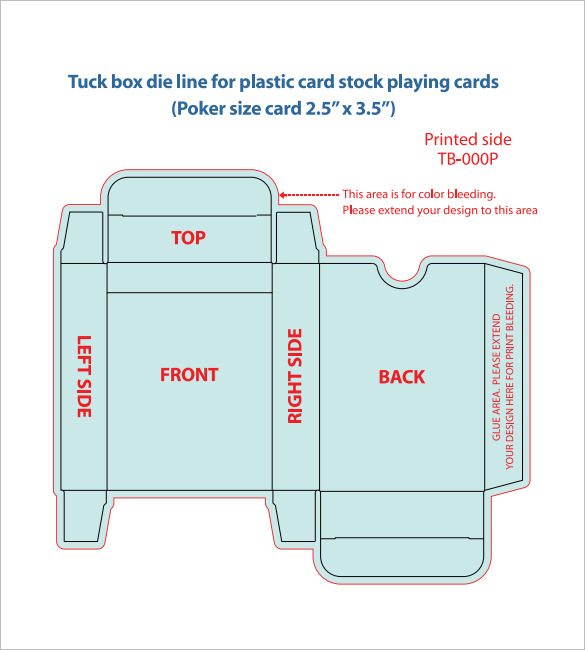
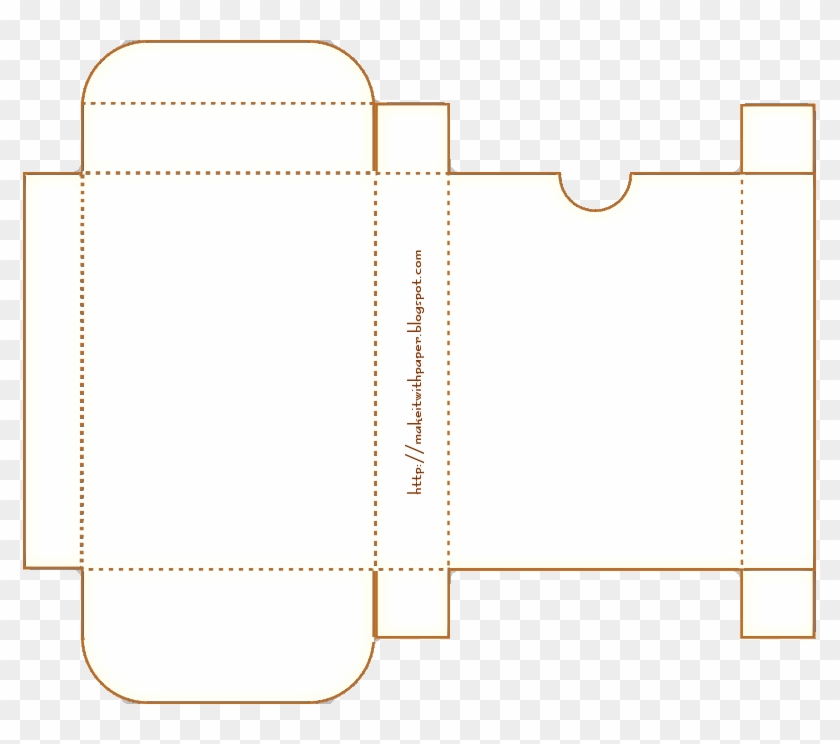
Finding and Using a Playing Card Box Template
The template is the heart of this project, you know? It gives you the shape and the fold lines, so you don't have to guess. There are many places to find them, and using one is pretty straightforward.
Where to Find Templates
You can find templates in a few different spots, so it's worth looking around.
Online Craft Sites: Many websites dedicated to crafts offer free printable templates. A quick search for "free playing card box template" will give you lots of options. You might find some really cool designs there, you know?
DIY Blogs: Lots of people who enjoy making things share their templates and tutorials on their blogs. These often come with step-by-step pictures, which can be very helpful. It's like getting advice from a friend who's already done it, basically.
Design Software: If you're feeling a bit more adventurous, you could even try making your own template using design software. This gives you total control over the size and shape, which is pretty advanced.
Steps to Create Your Box
Once you have your template, the actual making part is fun and pretty simple, you know? Just take your time with each step.
Print Your Template: Print the playing card box template onto your chosen cardstock. If your cardstock is too thick for your printer, you can print the template on regular paper first, then trace it onto the cardstock, which is a good workaround.
Cut It Out: Carefully cut along the solid lines of the template. Use your craft knife and ruler for the straight edges to get really clean cuts. This step is pretty important for a neat-looking box, so take your time.
Score the Fold Lines: Use your scoring tool and ruler to make creases along all the dashed lines on the template. This helps the paper fold perfectly and makes your box look much more professional, honestly. It's a small detail that makes a big difference.
Fold the Box: Gently fold along all the scored lines. You'll start to see the box shape appear. Make sure your folds are crisp and neat, so the box stands up well.
Glue It Together: Apply glue to the tabs indicated on the template. Press them firmly into place, holding them for a few seconds until the glue starts to set. You want a strong hold here, so your box doesn't come apart, you know? Let the glue dry completely before you put your cards inside.
Personalizing Your Card Box
This is where your playing card box truly becomes yours, you know? It's where you get to add all the fun stuff and make it special. This is the "creation of music" part, where the box becomes more than just a tool.
Design Ideas to Make It Yours
There are so many ways to make your box reflect your style, so feel free to experiment.
Color Schemes: Pick colors that you really like, or colors that match the cards you'll be putting inside. Maybe you like bright, bold colors, or perhaps something more calm and subtle. It's totally up to you, basically.
Themes: Think about a theme that fits your interests. If you like playing chess, maybe you could add some chess-related drawings. If you like playing tennis, you could put a little tennis racket on it. The possibilities are pretty endless, you know?
Patterns and Textures: Use patterned paper or add textures with different materials. You could even draw your own patterns directly onto the box before you fold it, which is pretty cool.
Names or Initials: Put your name or initials on the box. This makes it clearly yours and adds a personal touch. It's a simple idea, but it makes a big difference, honestly.
Adding a Bit of Flair
These little extras can really make your box pop, so don't be afraid to try them.
Stickers and Decals: These are an easy way to add images or fun sayings. You can find stickers for almost any theme, so you'll probably find something that fits.
Drawing or Painting: If you enjoy art, you can draw or paint designs directly onto your box. This gives it a truly unique, handmade feel. It's like having your own little canvas, you know?
Ribbons and Bows: A small ribbon tied around the box, or a decorative bow, can add a touch of elegance. It makes the box feel a bit more like a gift, even if it's just for yourself.
Lamination or Clear Coat: For extra durability and a bit of shine, you could cover your finished box with clear contact paper or spray it with a clear protective coating. This helps protect your design and makes the box last even longer, which is pretty smart.
Keeping Your Cards Safe and Ready
Having a custom playing card box means your cards are always ready for action. You won't have to say "no" to a game because your cards are scattered or damaged, you know? Instead, they'll be neatly tucked away, waiting for your next game night. It's like having your tennis racket ready for Tuesdays; you're always prepared.
A good box protects your cards from dust, spills, and getting bent in a drawer. This is really important if you have a favorite deck that you've been playing with for a long time, maybe even for five years. You want those cards to stay in great shape so you can keep enjoying them, honestly.
Plus, when your cards are organized, it's easier to find them and get a game going. There are no movies playing on Christmas Day, but there are always cards ready to play when they're in their own special box. It just makes everything a bit smoother, which is pretty nice. You can learn more about card game history if you are interested in the games themselves.
So, go ahead and try making your own playing card box. It's a rewarding project that combines creativity with practicality. You'll end up with something that looks good, protects your cards, and makes getting ready to play a game a little bit more fun. Plus, it's a great way to use your hands and make something truly unique. You can find other cool ideas on our site , or perhaps check out this page for more craft inspiration.
Frequently Asked Questions About Card Box Templates
People often have questions when they start a project like this, so here are some common ones, you know?
How do I make sure my playing card box template fits my deck perfectly?
The best way to make sure your box fits just right is to measure your deck of cards before you pick a template. Most standard playing card decks are pretty much the same size, but some special decks can be a little different. So, check the template's listed dimensions and compare them to your cards, basically. If you can, print a test piece of the template on plain paper first to see how it lines up with your cards.
What kind of paper is best for a durable playing card box?
For a box that will last a while, you really want to use a heavy cardstock or craft board. Something around 80lb to 110lb (or 200-300 gsm) works very well. This kind of paper is thick enough to hold its shape and resist bending, but it's still easy to cut and fold. Using a lighter paper might make the box too flimsy, honestly, and it won't protect your cards as well.
Can I make a playing card box template without a printer?
Yes, you can, but it takes a bit more effort. You would need to measure your deck very carefully and then draw out the template shape directly onto your cardstock using a ruler and pencil. You'd draw all the cut lines and fold lines yourself, which is a bit like drafting a blueprint. It's totally doable if you're good with measurements and straight lines, so that's an option.

Detail Author:
- Name : Mandy Bartoletti I
- Username : qlindgren
- Email : liliane.mckenzie@gmail.com
- Birthdate : 2004-08-14
- Address : 22610 Shields Viaduct South Evans, ID 88538
- Phone : 331-412-0899
- Company : Windler-Heaney
- Job : Healthcare Support Worker
- Bio : Deserunt mollitia qui et earum sit. Deserunt voluptate sit amet quibusdam a dignissimos. Sit provident molestiae pariatur commodi. Quas ratione quaerat unde magni in. Alias eos et dolore id.
Socials
linkedin:
- url : https://linkedin.com/in/boganc
- username : boganc
- bio : Dolor et totam quod delectus.
- followers : 4910
- following : 1488
twitter:
- url : https://twitter.com/caterina1107
- username : caterina1107
- bio : Est cumque similique reiciendis. Officia fugiat quo perferendis odit dolorem ducimus. Pariatur non nulla porro iure. Non dolorem eligendi et voluptatibus.
- followers : 2820
- following : 598
instagram:
- url : https://instagram.com/cbogan
- username : cbogan
- bio : Nam alias aut laborum et iure neque. Consequatur sed dolor culpa in.
- followers : 2475
- following : 2915
